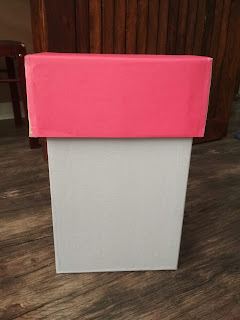
I love a good cardboard box DIY! It makes me so happy to convert an unused, old cardboard box that is just lying around, into something fun and pretty! This is one of my favourite cardboard box DIYs, if I am to choose one from the ones I have made so far.
The little fellow has a big collection of toy vehicles of all sizes - tiny, medium and big! He loves each one and engages in a lot of self play with these vehicles, at least for a few minutes every day.
He have different props and accessories to pair up with the different sets of vehicles. The tiniest set of vehicles are best played in our sensory rice bin. The medium sized ones are used to play along with play dough. I try to encourage him to keep them separate as much as possible, to avoid messing them up too much and also to up the fun factor! A sticky wheel after a play dough play session is not going to be fun in a rice bin!
So, for the big vehicles, he didn't have any particular prop to pair up as such. He would just run them over cushions pretending it to be speed breakers. Since I had two boxed that seemed just perfect to make a big enough fuel pump to suit the big vehicles, I decided to make it as a play prop for them.
Honestly I am not sure who had more fun - me making the cute little pump or he playing with it! It was just super fun to put this together. I had planned on using the cap of his spray bottle for this DIY, but when I found a store that sells only the spray bottle cap, I was super delighted! The pump turned out way better than I had expected and it is still as good as new, after a month of play.
Things Needed:
Cardboard Boxes - 2. (Both rectangle in shape, one big and one small.)
Wrapping Sheet
Spray Bottle Cap / Spray Gun
Rope
Craft Paper
Tissue Paper Roll
Glue | Glue Gun | Cello Tape | Scissors
How I made it:
- I kept the bigger box as is, sealed the openings shut.
- The smaller box, I opened on one side and tucked in the flaps so as to make it an open box. You may leave this as is, but I wanted the top box to be able to sit on the bigger box without having to paste it on it.
- I then wrapped both the boxes with paper, the bigger in a grey coloured paper and the smaller one with red craft paper.
- Now the basic structure is ready. See how the red box sits on top of the grey one? I liked this setup and it was easier to dismantle and move it around.
- One one side of the red box, I stuck a tissue paper roll (which I had covered with a black paper).
- Through the roll, I secure tied a rope, the other end of which I inserted in to the straw of the spray bottle cap/spray gun. The spray bottle gun fitted perfectly into the tissue paper roll handle when not in use. This was our cute little 'pump' holder!
- Finally, I added on some wordings to the pump and it was all ready! I was overjoyed with the end product and was so happy to see the little one pretend play with it, along with his big vehicles. :)


Awesome seems very interesting as any activities with vehicle can't go wrong. Will definitely try this activity with my Mini .
ReplyDeleteV nice
ReplyDelete